Example project: browser-style authentication, status comparison, scheduled alerts, and state persistence
Overview
This project demonstrates how to build a scheduled notifier workflow in Omniscope.
The workflow regularly checks a remote system, compares its current status with the last known status, and sends a notification only when the status changes.
The example monitors the status of a virtual machine, but the same pattern can be used for:
- Service availability.
- Job or process completion.
- API health.
- Stock or inventory changes.
- Data refresh status.
- Website or application state changes.
- Threshold-based alerts.
- Any other value that needs to be monitored over time.
The project also demonstrates:
- Logging in to a website using browser-style form authentication.
- Reusing the resulting session cookie in an HTTP request.
- Parsing a JSON response.
- Persisting the last known status.
- Comparing the current and previous states.
- Using control-flow blocks to decide whether a notification should run.
- Configuring Scheduler actions in the correct order.
- Understanding the difference between Refresh from Source and a normal workflow execution.
How the notifier works
The workflow follows this sequence:
Log in to the website
↓
Obtain the authenticated session cookie
↓
Request the protected page or API
↓
Parse the JSON response
↓
Extract the current status
↓
Read the previously saved status
↓
Compare current and previous status
↓
Notify only when the value has changed
↓
Save the current status for the next run
During each scheduled execution:
Current status = The value returned by the latest HTTP request
Previous status = The value saved during the preceding execution
A notification is sent only when these values are different.
Previous status | Current status | Notify |
RUNNING | RUNNING | No |
RUNNING | STOPPED | Yes |
STOPPED | STOPPED | No |
STOPPED | RUNNING | Yes |
Example project
In this example, the workflow monitors the status of an H100 virtual machine.
The protected endpoint returns a JSON response containing the current state.
A simplified response might look like:
{
"name": "h100",
"status": "RUNNING",
"updatedAt": "2026-07-21T09:00:00Z"
}
The workflow extracts the value:
RUNNING
It then compares it with the value stored during the previous scheduled execution.
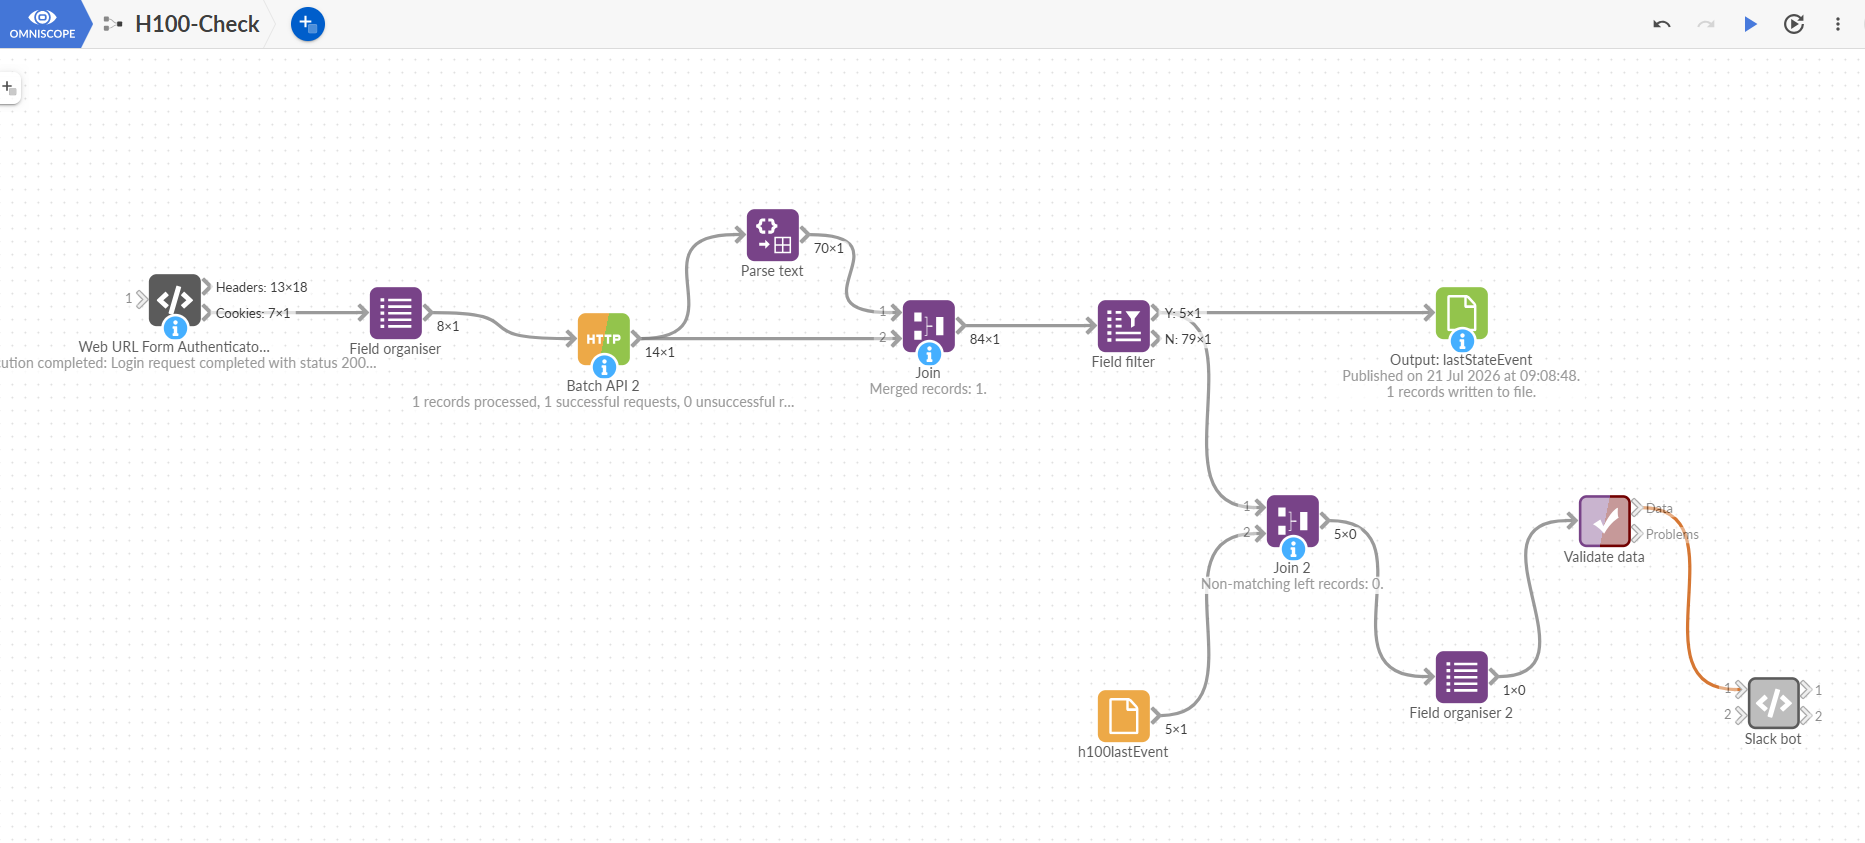
1. Log in using WebFormSessionLogin
Add the published WebFormSessionLogin block to the workflow.
The block logs in to a website using form-based authentication and establishes an authenticated web session.
Configure the block with:
- The login URL.
- The username.
- The password.
The block returns the session cookies and response information generated by the login process.
This is useful for websites where authentication behaves like a browser login rather than a simple API token.
A typical browser-style login may involve:
Submit login form
↓
Receive a redirect response
↓
Receive a session cookie
↓
Use the cookie on later requests
The session cookie can then be passed to the Batch HTTP block.
2. Prepare the session cookie
Use a Field Organiser or Record Filter to select the required session cookie from the WebFormSessionLogin output.
For example, the cookie may be named:
wp_session
Create a field containing the HTTP cookie header value:
wp_session=<cookie value>
The Batch HTTP request will use this value as:
Cookie: wp_session=<cookie value>
Only the cookie name and value are required.
Cookie attributes such as the following should not be included in the outgoing request:
Path
Secure
HttpOnly
SameSite
Expires
3. Request the protected data
Connect the prepared cookie data to a Batch HTTP block.
Configure the Batch HTTP block to request the protected page or endpoint containing the status information.
For example:
Method: GET
URL: https://example.com/api/vm/status
Add the session cookie as a request header:
Cookie: wp_session=<cookie value>
The request now uses the authenticated session created by WebFormSessionLogin.
Depending on the target website, additional headers may also be required, such as:
Accept: application/json
Referer: https://example.com/dashboard
The Batch HTTP block should return the same data that is available to the logged-in browser session.
4. Parse the JSON response
The response body from the Batch HTTP block is normally returned as text.
Use a Parse Text block, a JSON parsing block, or a suitable formula to extract the required status value.
For example, from:
{
"virtualMachine": {
"name": "h100",
"status": "RUNNING"
}
}
extract:
virtualMachine.status
Transform the result into a simple dataset such as:
Resource | Current status | Checked at |
h100 | RUNNING | Current execution time |
It is useful to standardise the value before comparing it.
For example, these values:
running
RUNNING
Running
can all be converted to:
RUNNING
Also remove leading or trailing whitespace where necessary.
5. Read the previously saved status
To detect a change, the workflow must retain the result from the preceding execution.
In this example, a File Input block reads a small state file containing the last known status.
For example:
h100LastEvent
The file contains one row:
Resource | Last status | Last checked at |
h100 | RUNNING | 2026-07-21 09:00:00 |
This file represents the last successfully observed state. It is a snapshot of the most recent known status, not an event history.
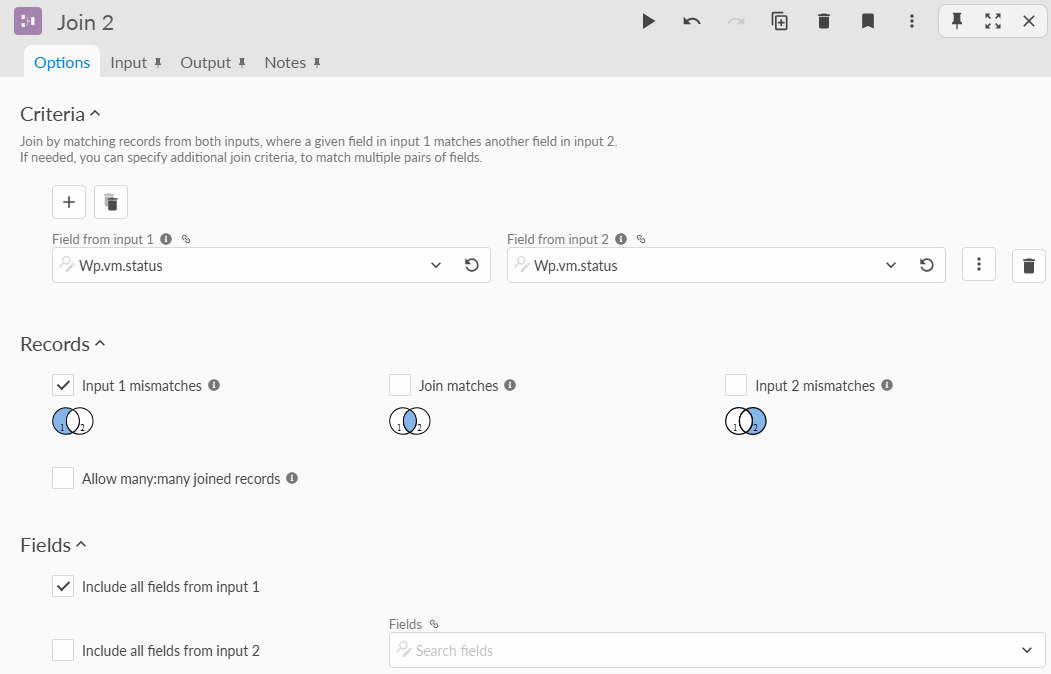
6. Compare the current and previous states
Join the current API result with the saved state.
Use a stable identifier as the join key, such as "Current status" to see if the value are different, essentially allowing the "mismatches" to go through. If the status is the same we dont want to have any row downstream of the workflow.
7. Control whether the notification executes
The notification block should execute only when a status change has been detected.
In this example, the workflow uses a Validate Data block before the Slack block. The validation ensures that only valid change events reach the notification step, by looking at how many records are passed through.
When there is no data, the execution is halted, the notification path produces no valid event and the Slack block does not send a message.
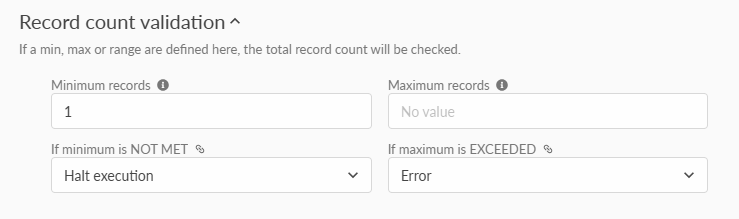
Other Omniscope control-flow blocks may also be used. The important requirement is that the notification block must not execute when there is no status change.
This is especially important for blocks that produce side effects, including:
- Sending Slack messages.
- Sending emails.
- Calling webhooks.
- Creating tickets.
- Triggering external processes.
8. Send the notification
Connect the change-event path to the required notification mechanism.
This may be:
- Slack.
- Email.
- Microsoft Teams.
- A webhook.
- An incident-management platform.
- A ticketing system.
- Another HTTP API.
A notification might contain:
H100 status changed
Previous status: RUNNING
Current status: STOPPED
Detected at: 2026-07-21 10:05
Useful notification fields include:
- The monitored resource.
- The previous status.
- The current status.
- The time the change was detected.
- The environment.
- A link to the monitored system.
- Any relevant error or diagnostic information.
9. Save the latest status
After the comparison has been completed, save the current status so it can be used during the next scheduled execution.
Use a File Output block to write the latest state.
For example:
Output name: lastStateEvent
File: h100LastEvent
The output should contain only the fields required by the next comparison:
Resource | Last status | Last checked at |
h100 | STOPPED | 2026-07-21 10:05:00 |
Configure the output to replace the previous snapshot rather than append to it.
During the next execution, this saved value becomes the previous status.
Optional: maintain a status-change history
The latest-state file should remain small and contain only the current snapshot.
A separate Data table can be used to maintain an event history. Append a row only when the status changes:
Resource | Previous status | Current status | Changed at |
h100 | RUNNING | STOPPED | 10:05 |
h100 | STOPPED | RUNNING | 11:20 |
This produces a useful history of actual events without storing every scheduled poll.
Status comparison
│
├── Changed → Send notification
│
├── Changed → Append to event history
│
└── Always → Replace latest-state snapshot
10. Create the Scheduler project actions
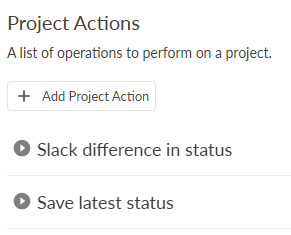
The workflow uses two project actions:
1. Check for a status difference and send the notification.
2. Save the latest status.
The order is important:
1. Slack difference in status
2. Save latest status
The comparison must happen before the latest status replaces the previous status.
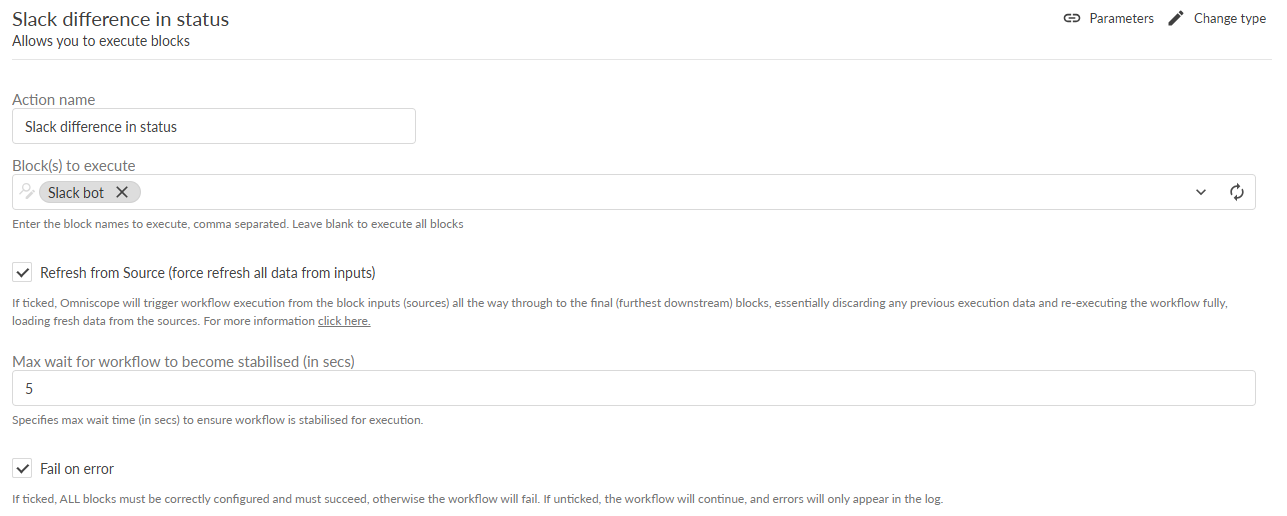
Action 1: Check and notify
Create an Execute Blocks project action.
Example configuration:
Action name:
Slack difference in status
Blocks to execute:
Slack bot
Enable:
Refresh from Source
This causes Omniscope to execute the workflow from its source blocks. It will:
1. Run WebFormSessionLogin.
2. Obtain a fresh authenticated session.
3. Request the current status.
4. Parse the latest response.
5. Read the saved previous status.
6. Compare the two values.
7. Send the notification when required.
Action 2: Save the latest state
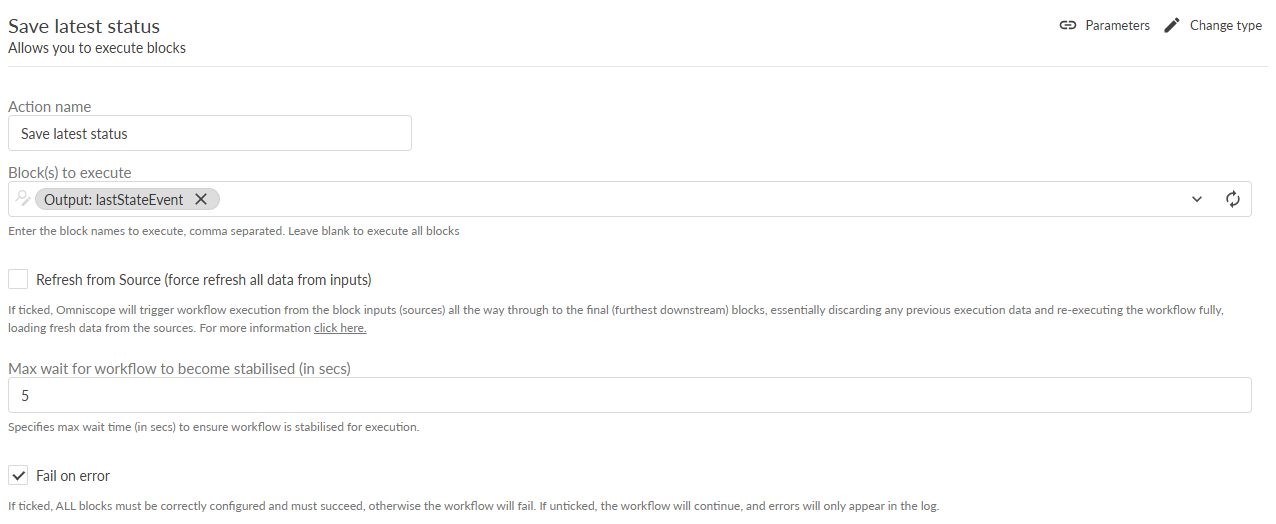
Create a second Execute Blocks project action.
Example configuration:
Action name:
Save latest status
Blocks to execute:
Output: lastStateEvent
Leave this setting disabled: Refresh from Source
This action reuses the status data already calculated by the first action. It does not need to authenticate or call the remote endpoint again.
Refresh from Source versus normal Execute
The distinction between these execution modes is central to the workflow.
Refresh from Source
When Refresh from Source is enabled, Omniscope starts at the workflow sources and reloads the data.
In this project, that means:
Run WebFormSessionLogin
↓
Obtain a fresh cookie
↓
Call the protected endpoint
↓
Parse the latest response
↓
Read the previous-state file
↓
Recalculate the comparison
Use this for the first action because the notifier must check the current remote state.
Normal Execute
When Refresh from Source is disabled, the action can reuse the data already produced by the preceding action.
In this project, the second action only needs to:
Use the current calculated status
↓
Save it as the new latest state
This avoids performing the login and API request twice.
If both actions used Refresh from Source, the workflow could make two separate API requests during one scheduled run. That would be unnecessary and could create inconsistent results if the remote status changed between the two requests.
11. Configure the scheduled sequence
Add both project actions to the same scheduled task.
Run them in this order:
1. Slack difference in status
2. Save latest status
Configure the required frequency, for example:
Every five minutes
The scheduled process becomes:
Refresh the remote status
↓
Compare with the saved state
↓
Notify if changed
↓
Save the latest state
↓
Wait until the next scheduled run
Initialising the workflow
Before enabling the schedule, initialise the saved-state file.
Run the workflow once and save the current valid status without sending a notification.
This creates the initial snapshot:
Resource | Last status |
h100 | RUNNING |
From the next execution onward, the workflow can compare the latest status against a known previous value.
The first run should not normally be treated as a state-change event.
Final workflow structure
The completed notifier can be summarised as:
WebFormSessionLogin
↓
Prepare session cookie
↓
Batch HTTP
↓
Parse JSON response
↓
Extract and validate current status
│
├──────────────────────────────┐
│ │
Previous-state File Input │
↓ │
Join current and previous states │
↓ │
Compare status │
↓ │
Validate Data / If Then Split │
↓ │
Slack, email, or webhook │
↓
Save latest-state file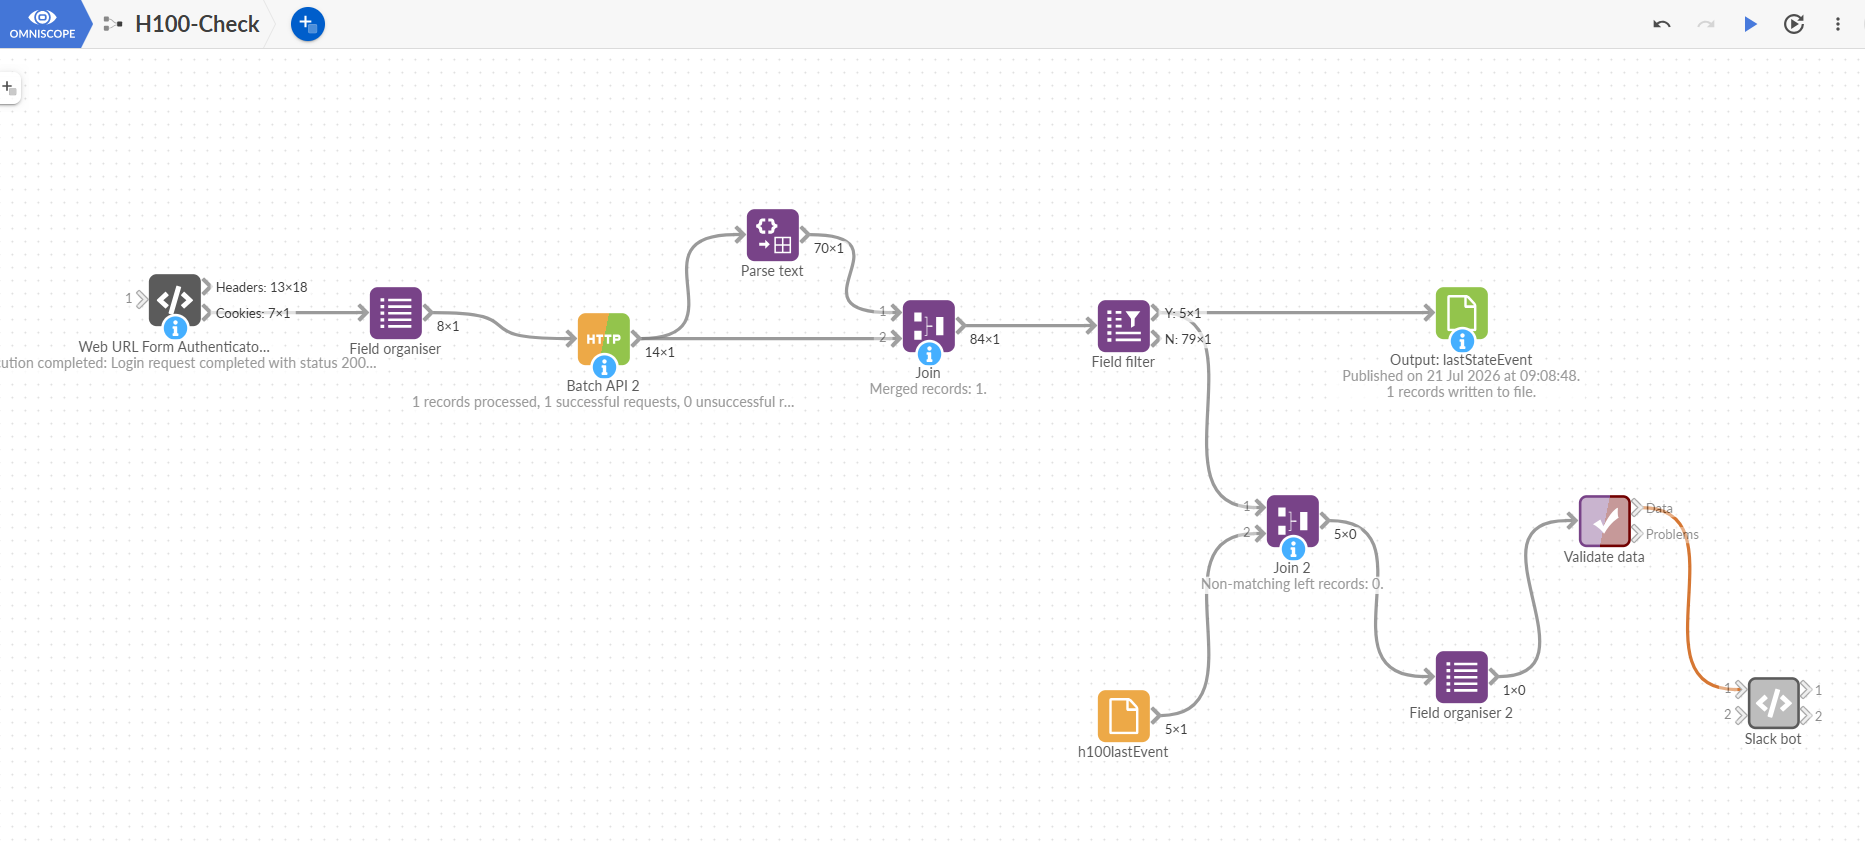
Result
Once configured, the project automatically:
1. Logs in to the monitored website.
2. Retrieves the current remote status.
3. Parses the response.
4. Compares the result with the last known state.
5. Sends a notification only when a change occurs.
6. Stores the latest state for the next scheduled execution.
This pattern provides a reusable foundation for building scheduled monitoring and alerting workflows entirely within Omniscope.
Was this article helpful?
That’s Great!
Thank you for your feedback
Sorry! We couldn't be helpful
Thank you for your feedback
Feedback sent
We appreciate your effort and will try to fix the article