In Omniscope, parameters in a data workflow can be adjusted to modify the behaviour of the workflow without changing the underlying logic: to automate repetitive tasks and customise the workflow for different requirements. They allow users (usually report editors) to dynamically alter input values, control various aspects of the data processing and analysis, and customise outputs based on different scenarios.
Parameters can be used for tasks such as filtering data, setting thresholds, defining calculation rules, and controlling the execution of different workflow branches.
In this article, we are demonstrating two similar use cases where we wish to give the report viewer the option to influence ‘what-if’ scenarios and explore multiple outcomes or pick the result based on some conditional logic. In both cases, the data pipeline requires execution with different parameter combinations.
Omniscope’s For Each block is used to iterate through and implement multiple parameter values, then append the results, assigning the iteration number to each row.
In the two variations explained below, the dashboards contain UI devices that allow report viewers to change the parameter values, then pass them to the workflow to recalculate formulas.
The process:
1. In the workflow’s 3-dot menu > Parameters dialog, create one or more variables and assign them an initial value.

2. Add a data source and a Field Organiser block to format the input fields and to add new fields linked to the parameters (3-dot menu next to the field name > see the default value param option). You can also add new formula fields to combine data values with user-driven values.
These will initially return results based on the default parameter values, as defined in the parameter menu.

3. Add a Text Input block and create a table with all parameter value combinations: each parameter name is a column header and the values are listed below.
Note: The column headers must have exactly the same names as the parameters defined in the param dialog for this mechanism to work.
Each row in this “Iterations input” might be a what-if “scenario” representing a particular combination of one or more parameter values.

4. Add a For Each block and connect the data as its first input (which incorporates a Field Organiser where the parameters are referenced and integrated into formulas), and the Text Input block with parameter values as the second.

The For Each block allows you to pick whether to iterate through one or all parameters, and which fields to include in the result. The block’s result will append the results of all iterations.
The block will replace params' default values with the values from the input list.
Example A Implementation:

In the Report block, the first input is the For Each result, while the second input is the parameter table.
In the dashboard we added an Editable Table, as UI which allows the user to edit every parameter value (the table's source is the Text input with param values).
A community custom view ‘Workflow Execution’ (available in the Add view menu, configured using the cog > Settings menu) allows the viewer to pass the parameter values to the workflow and execute it when ready, recalculating formulas with new values.

Example B implementation: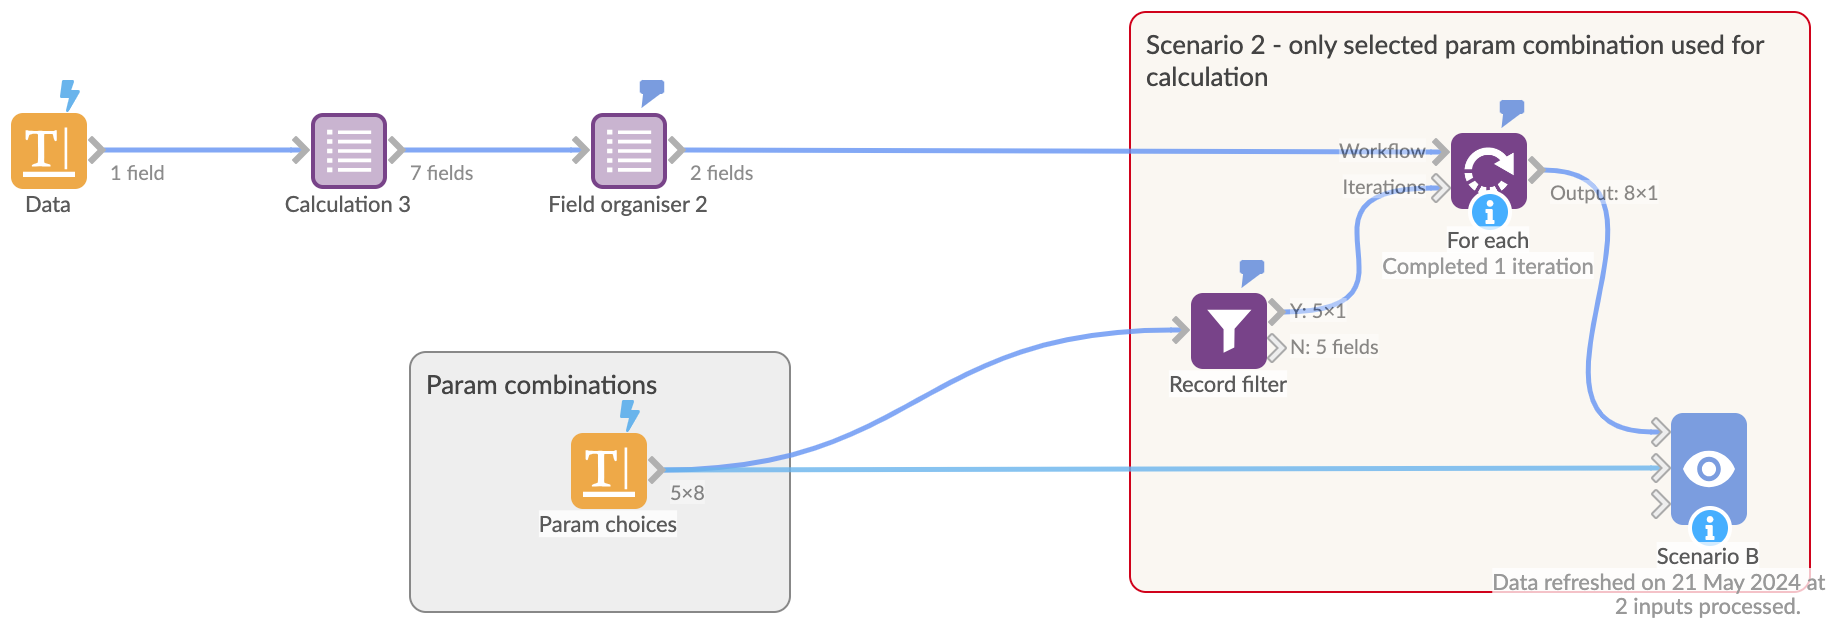
In a similar use case, we are inserting a Record Filter block between the Text Input (containing the same table with parameter values) and the For Each block, where filtering function is linked to the parameter values selected in the dashboard.
This method will narrow down the parameter choices passed to For Each block, allowing the user to create a rule-based logic such as: if user's parameter A choice = 10, and B choice = 25, then parameter C = 100 and D = 200.
This is achieved by using two custom views in the report - ‘Switch Param and Execute Workflow’, which will trigger instant workflow execution and insert the latest chosen value in the referenced blocks (Field Organiser and Record Filter).
The Switch Param views are connected to the Param combinations data source, and therefore will pick up all possible value choices and display them as radio buttons. In this instance, the outcome is a single-row result, rather than a list of multiple scenarios based on multiple iterations/ param combinations.

Tip: the choice between the custom views which send the parameter to the workflow might depend on how many changes you wish to make before executing, also on the size of the dataset. If you wish to make many changes in the table with param values, and the dataset is large, then you probably should opt for the 'Execute workflow' view, so the user can hit the button once all the variable choices are made, and the workflow will process them in one go.
The above project file is attached and can be downloaded for further exploration.
Important: parameter editing in the report's Editable table is subject to authentication process and the user having the right permissions (look for 'report only editor' permission).
Was this article helpful?
That’s Great!
Thank you for your feedback
Sorry! We couldn't be helpful
Thank you for your feedback
Feedback sent
We appreciate your effort and will try to fix the article