Connect Codex, Claude Code or OpenCode to an Omniscope project, or a whole folder of projects, and let the agent build directly in it. It can prepare data sources, add and connect blocks, run the workflow, create a Report, inspect the results, and fix what went wrong.
The result is a normal Omniscope project. You can open it, inspect the workflow, change any block, and run it again.
The work remains visible and editable in Omniscope rather than disappearing into generated code you have to reverse-engineer.
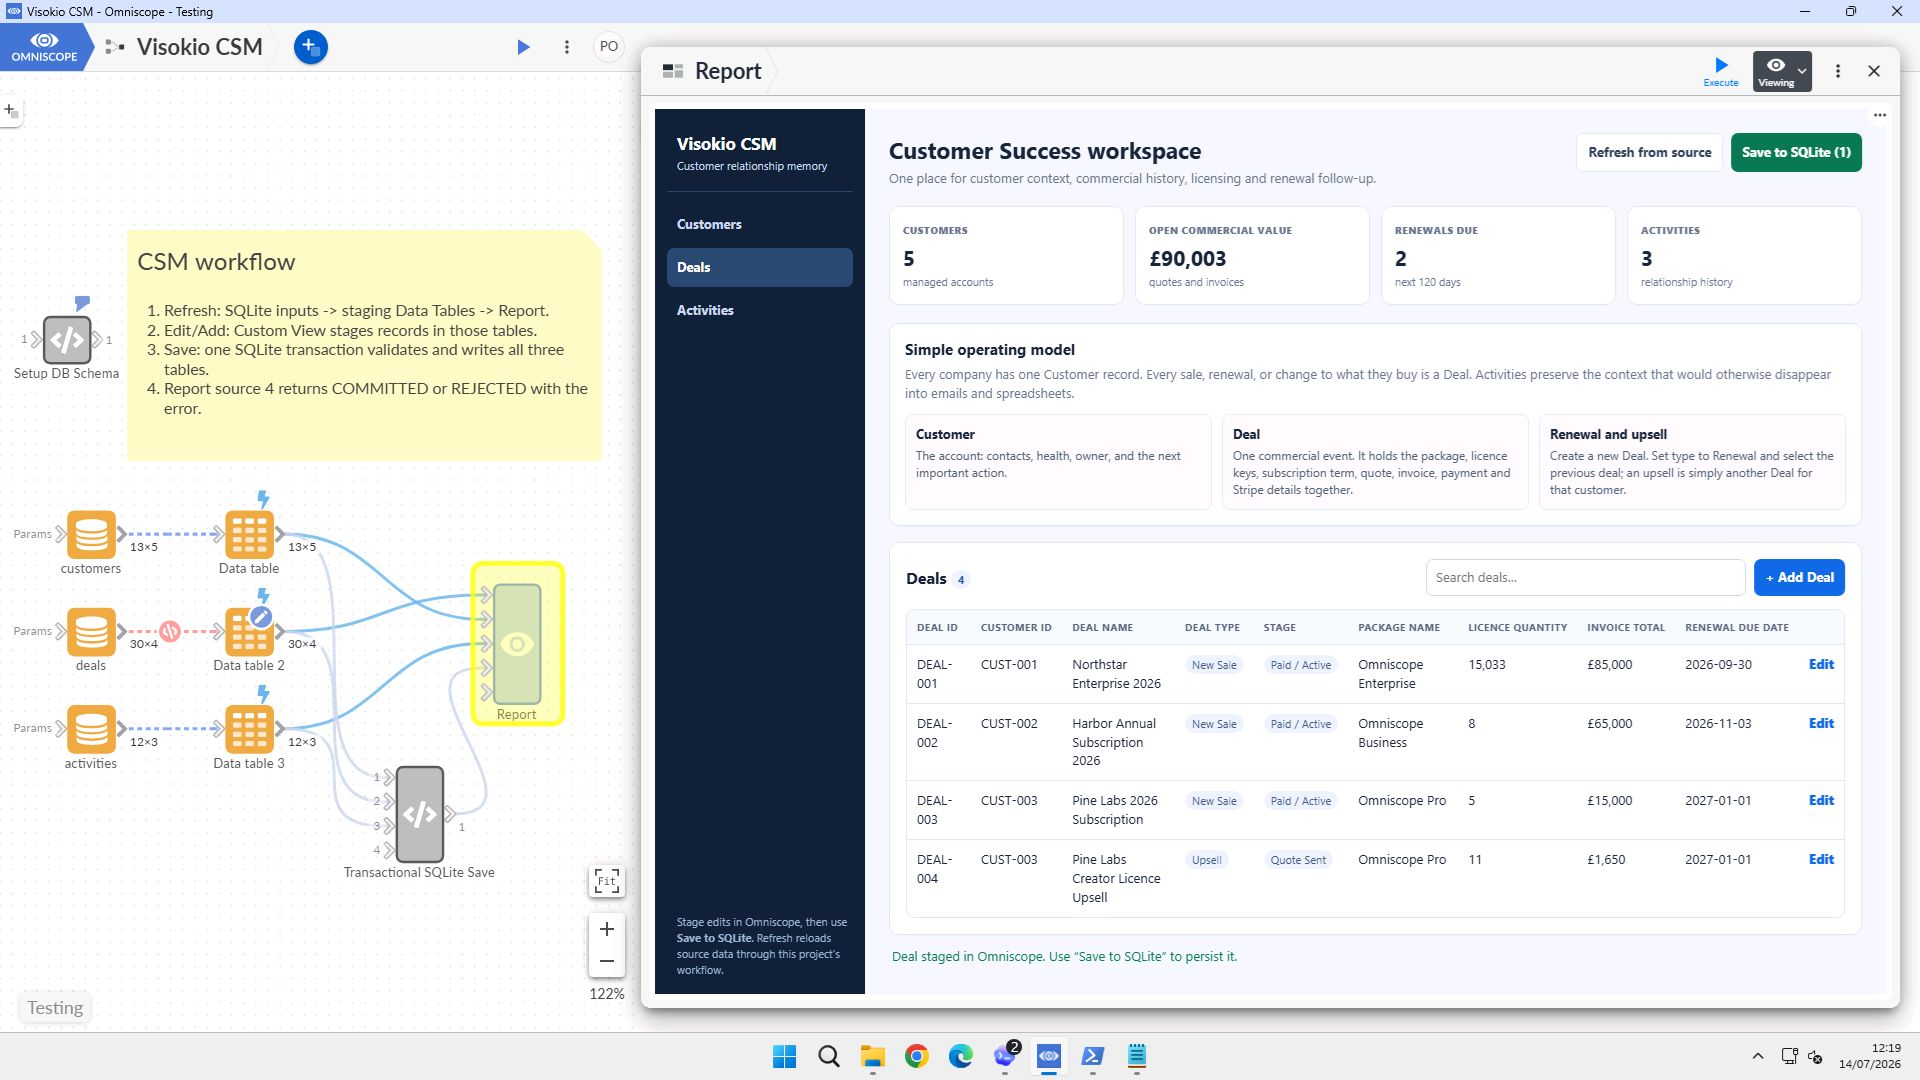
As an example, we built a working Customer Success application this way in a single Codex session. The finished project is public, and Omniscope as a tool for AI agents explains how this approach fits alongside the AI features that run inside Omniscope.
This article covers the setup: the MCP endpoints, the authentication key, and the configuration required for each client.
If you have an Omniscope Cloud account, there is a quicker route: connect your agent to Omniscope Cloud over MCP and sign in with your usual account, with no key to create and no server to configure. Your agent then works in your Cloud folder straight away. See Use Omniscope Cloud from Claude or ChatGPT.
Before you start
You'll need:
- An Enterprise licence. MCP and the REST API are covered by Enterprise Automation capabilities.
- Allow AI agents to connect switched on, in Admin → MCP & Agents. It is off on a new installation, because a connected agent can do anything its key's permissions allow. While it is off, every MCP and REST tool address answers 404. It takes effect immediately, with no restart.
- For the folder endpoint, the same switch covers it. To let the agent list, create and upload into projects, Enable Project API must also be on, in Admin → Advanced → API. It is on by default.
One project, or a whole folder
There are two ways to connect an agent, and both offer the same workflow tools.
One project
Append /api/mcp to the project's address:
https://your-server.example.com/Folder/Project.iox/api/mcp
The key reaches that project and no other.
The same tools are also available over REST at the project's address, for callers that would rather not speak MCP:
| Route | Purpose |
|---|---|
…/api/mcp | MCP over JSON-RPC. This is what an agent connects to. |
…/api/tools | REST. POST {"list": true} for discovery, or a batch of calls. |
…/api/tools/<tool> | REST, one tool per URL. The body is the tool's arguments. |
A whole folder
Append /_api_/v1/mcp to a folder's address, or to the server root for the whole server:
https://your-server.example.com/Folder/_api_/v1/mcp
One connection reaches every project in that folder and its subfolders that the key may use. The agent names the project on each call, as a path relative to the folder (for example Team/Sales.iox), and can also list projects, create a project from a template, and upload data files.
Prefer the narrowest folder that does the job: a key on the server root reaches every project its group may use.
Discovery is part of the protocol, so you do not have to tell the agent what Omniscope can do. It asks, and gets the current tool list back.
Create a key for the agent
An API key is a long-lived credential for a machine. It is not a login: presenting one will not sign the agent into the Omniscope interface, and it is honoured only on the programmatic routes above.
What the agent can read, cell values included, is set by this key's folder permissions. The Data sharing level on AI providers in Admin > AI Settings does not apply here: it applies only when Omniscope itself calls an AI provider. The agent runs on its own model, and whatever it reads goes to that model. No AI provider needs to be configured.
Open the project list, click your avatar in the top right, choose Edit permission, and work down the dialog.
Make a group for your agents. Under Groups, click Add Group and name it something you will recognise later - MCP will do.
Give it the API permission. Set Group permissions to Custom, click Configure, and set Full project access via APIs to Yes.
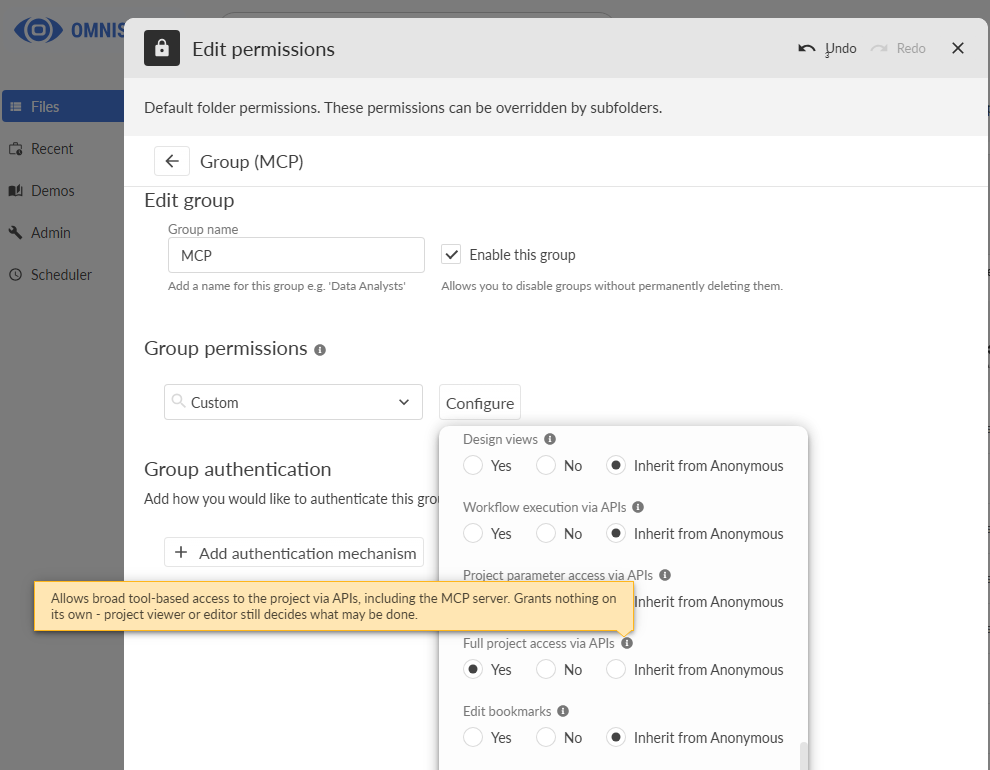
That permission opens the door and nothing else. As the tooltip says, it grants nothing on its own: whether the agent may read, or also write, is still decided by Project viewer and Project editor in the same panel. For an agent that will author a project, give it Project editor. For one that should only read and report, leave it at viewer.
Add the key. Under Group authentication, click Add authentication mechanism and choose API keys.
Click Add. Omniscope generates a key in your browser, hashes it, and sends only the hash to the server. It looks like this:
omsk_ADYMeQQmn2A_ro1FVx-IO4DrdqrLfe_nCsw68nlMpKsCopy the key before you close the dialog. It is stored as a BCrypt hash, so nobody - including you, including us - can recover it afterwards. Lose it and you generate a new one, which stops the old one working.
Then click Save. The dialog will not let you save a key that was not hashed properly, so a successful save means the credential is sound.
To rotate later, use the regenerate button on the row. The key's identity stays the same, so the access log still attributes past activity to it, while the credential itself changes and the old value stops working immediately.
For the folder endpoint, set up the group and key in the folder you will connect to: open that folder in the project list, then avatar → Edit permission. Give the group Full project access via APIs, plus List directory so the agent can find projects. Add File management if it should create projects, and Project editor if it should change them.
A subfolder with its own permissions is a separate area: the key needs a group there too, or the agent cannot reach projects inside it.
Configure the client
For the folder endpoint, use the folder URL in any of the configs below. One entry covers every project in the folder.
Codex
Add a [mcp_servers.…] table to ~/.codex/config.toml, or use .codex/config.toml inside a project:
[mcp_servers.omniscope] url = "https://your-server.example.com/Folder/Project.iox/api/mcp" bearer_token_env_var = "OMNISCOPE_MCP_TOKEN"Set OMNISCOPE_MCP_TOKEN to the key in your environment. Codex sends it as the Authorization header for you, and the key stays out of the config file and out of version control.
The IDE extension exposes the same settings under the gear menu → MCP servers.
If you would rather set the header directly, http_headers takes static values and env_http_headers reads them from the environment:
[mcp_servers.omniscope] url = "https://your-server.example.com/Folder/Project.iox/api/mcp" env_http_headers = { Authorization = "OMNISCOPE_MCP_AUTH" }Run codex mcp list to check it registered, and /mcp inside the Codex TUI to see it connected.
Claude Code
One command:
claude mcp add --transport http omniscope https://your-server.example.com/Folder/Project.iox/api/mcp --header "Authorization: Bearer omsk_…"If you configure it as JSON instead — in .mcp.json or ~/.claude.json — the entry needs "type": "http". A url with no type is treated as a configuration error rather than being guessed at.
Claude Desktop
Claude Desktop connects to remote MCP servers through Customize → Connectors → Add custom connector, which takes the server URL and, under Advanced settings, an OAuth Client ID and Secret. There is no field for a static header, so an Omniscope API key cannot be used here.
Use Codex or Claude Code for the API key route. If you need Claude Desktop specifically, authenticate through Omniscope's OpenID Connect integration instead, which is OAuth and does fit the connector model.
OpenCode
Add an entry under mcp in ~/.config/opencode/opencode.json, or in opencode.json at the root of a project:
{
  "$schema": "https://opencode.ai/config.json",
  "mcp": {
    "omniscope": {
      "type": "remote",
      "url": "https://your-server.example.com/Folder/Project.iox/api/mcp",
      "oauth": false,
      "headers": {
        "Authorization": "Bearer {env:OMNISCOPE_MCP_TOKEN}"
      },
      "timeout": 30000
    }
  }
}
Set OMNISCOPE_MCP_TOKEN to the key in your environment. OpenCode fills in {env:…} when it loads the config, so the key stays out of the file and out of version control. You can put the omsk_… key directly in the header instead, but only in a config you don't commit.
"oauth": false matters. Without it, OpenCode tries to start an OAuth sign-in when a server asks for authentication, and an Omniscope API key is not OAuth. timeout is how long OpenCode waits for the tool list. The default is 5 seconds, which can be too short for the full Omniscope tool set.
Run opencode mcp list to check that it registered and connected.
Tell the agent what you want, not how to click
Once connected, the agent discovers the tools itself. You give it an objective:
Connect to the Omniscope project on the MCP server. Look at what is already in the workflow, then load
customers.csvandrenewals.csv, join them on account ID, work out which renewals are at risk in the next 90 days, and build a Report with a summary view and a table I can filter by owner. Run the workflow and check the output before you tell me you are done.
Being able to say check the output is the part that changes how this feels. The agent runs the workflow through the same execution path the interface uses, reads the result, and corrects itself.
In our experiments it went further: where something was not exposed as a tool yet via the MCP or API, Codex drove the Omniscope interface as a person would.
Check it works
Ask your agent "list my Omniscope projects".
- 404: Allow AI agents to connect is off in Admin → MCP & Agents, or the URL is wrong (a folder URL must end in /_api_/v1/mcp). The two look the same on purpose, so check the switch first.
- 400 with no message: Workflow Ninja & MCP Server has been switched off in Admin → Labs, under Shipped features. It is on by default; turn it back on.
- 401: the key is missing, wrong, or not in a group on the folder you connect to, or the folder that holds the project.
- 403: the group lacks Full project access via APIs, or the licence lacks automation.
- "No project at that path": the project does not exist, is outside the folder, or the key cannot use it.
Running against Omniscope on your own machine
The guidance above mainly applies when an agent connects to Omniscope over a network. When you are running Omniscope on your machine and connecting to it from the same machine, the setup is intentionally a little different.
A local project has an address such as:
http://127.0.0.1:24679/Project.iox/api/mcp
A local folder, or the whole local server:
http://127.0.0.1:24679/_api_/v1/mcp
http://127.0.0.1:24679/Folder/_api_/v1/mcp
This is the simplest way to get started with MCP locally. Allow AI agents to connect still has to be on, in Admin → MCP & Agents: it is off on a new installation, local or not.
By default, requests from localhost use Omniscope’s Local desktop experience. This mode is designed for applications running on your own computer and gives them the same broad project and folder access you would expect when using Omniscope as a desktop application.
As a result, when connecting through localhost:
- An API key is not required or checked, even if one has been configured.
- The Full project access via APIs setting does not restrict the local connection, because the Local desktop experience takes precedence.
This is intentional behaviour for local desktop use. It allows Omniscope to work conveniently with other applications running on the same machine without requiring additional authentication for every local request.
If you prefer to use Omniscope as a network-accessible service, you can instead enable the external web server and connect through the address associated with the machine’s network adapter. In this configuration, the normal API authentication and permission settings apply, including API keys and project-access controls.
For server or production-style deployments, where you want all connections to follow those network authentication and permission rules, disable Local desktop experience under Admin → Web server → Network.
In short, you can choose the setup that suits your use case:
- Local desktop use: convenient access for applications running on your own machine, with full local permissions.
- External/network use: access through the external web server, with API keys and configured permissions enforced.
If you do not want agents to connect at all, turn off Allow AI agents to connect under Admin → MCP & Agents. This closes the MCP endpoints and the REST tool API for both local and remote connections.
Was this article helpful?
That’s Great!
Thank you for your feedback
Sorry! We couldn't be helpful
Thank you for your feedback
Feedback sent
We appreciate your effort and will try to fix the article